HƯỚNG DẪN CÀI ĐẶT BẢN CHÍNH THỨC CỦA XBMC cho Android TV Minix Neo, sau đó cấu hình nó với XBMC HUB WIZARD ADDON
yêu cầu
- Bất kỳ thiết bị Android với một NEON hoặc Tegra3 bộ xử lý
PHẦN THỨ NHẤT - ENABLE các nguồn không rõ
Bước 1: Vào mục "Settings" biểu tượng menu trên thiết bị Android của bạn.

Bước 2: Chọn "Security" tùy chọn trình đơn phụ.
Step 3: Kích hoạt tính năng “Unknown sources” option.

PHẦN THỨ HAI - DOWNLOAD XBMC CHO ANDROID
Bước 4: Mở ra ứng dụng "Trình duyệt web"
Bước 5: Vào tải phần mềm XBMC tại trang liên kết sau:http://xbmc.org/download/

Bước 6: Tải về phiên bản ổn định mới nhất của XBMC cho Android bằng cách nhấp vào liên kết dưới biểu tượng Android.

PHẦN THỨ BA - INSTALL XBMC CHO ANDROID
Bước 7: Điều hướng đến thư mục "tải về" trên thiết bị Android của bạn, hoặc mở Downloads menu ngữ cảnh trong ứng dụng trình duyệt Web.
Bước 8: Click vào tải XBMC tập tin apk và chọn để mở nó tại dấu nhắc.

Bước 9: Xác nhận rằng bạn muốn cài đặt XBMC cho thiết bị Android của bạn.


Bước 10: Sau khi cài đặt hoàn tất, chọn "Open" ứng dụng XBMC cho lần đầu tiên.

Bước 11: Hãy để nó ngồi và chạy một vài bản cập nhật cho các cặp vợ chồng đầu tiên của biên bản lần đầu tiên.

Bước 12: Thoát XBMC bằng cách nhấn vào nút tìm kiếm năng lượng ít biểu tượng ở góc dưới bên trái của màn hình của bạn.


PHẦN THỨ TƯ - Cấu hình XBMC
Bước 13: Khởi động "XBMC" và hướng đến "File Manager" tab dưới "SYSTEM" trình đơn.

Bước 14: Chọn "Add Source" chức năng ở phía bên trái của cửa sổ.

Bước 15: Trong lĩnh vực đầu đánh dấu đánh dấu "Nhập đường dẫn hoặc duyệt các vị trí phương tiện truyền thông" nhập "http://fusion.xbmchub.com" mà không cần trích dẫn, sau đó nhấn nút "Done" về phía trên màn hình bàn phím.


Bước 16: Dưới sự "Nhập tên cho nguồn Đây phương tiện truyền thông" lĩnh vực nhập "fusion" mà không trích dẫn và sau đó nhấn "Done" buttom để hoàn thành.


Bước 17: Nhấn vào nút "OK" ở dưới cùng của cửa sổ để tiết kiệm nguồn.

Bước 18: Xác minh rằng "fusion" được liệt kê ở phía bên trái của cửa sổ quản lý tập tin, sau đó quay trở lại menu chính.

Bước 19: Vào "Settings" dưới "SYSTEM" menu.

Bước 20: Chọn "Add-ons" tùy chọn trình đơn ở phía bên trái của cửa sổ, nhấn "Ok" nếu nhắc nhở với một tin nhắn sử dụng lần đầu tiên.


Bước 21: Chọn “Install from zip file” từ bảng chức năng.

Bước 22: Bấm vào “fusion” .

Bước 23: Mở thư mục “hubwizard-beta” .

Step 24: Choose the “plugin.video.hubwizard.zip” file and wait a few seconds for it to install, then return to the main menu.

Step 25: Navigate to the “PROGRAMS” menu, then to “Program Add-ons” if given the option.

Step 26: Click on the “Hub Wizard” addon listed.

Step 27: Wait for the short promotional message to play, press the back or exit button to hide it afterwards.

Step 28: Select the “Android” icon from the listed platforms.

Step 29: Wait a few minutes for the add-on to download the appropriate configuration content.

Step 30: Press “OK” when prompted that the procedure is complete, then return to the main menu.

Step 31: Quit “XBMC” by clicking the little power button in the lower left corner or reboot your device then relaunch it and voila!
Step 32: Enjoy your fully customized, pre-configured XBMC setup.

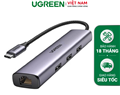 Dock sạc và hub mở rộng cổng kết nối là một trong những phụ kiện không thể thiếu cho người dùng laptop, tablet, PC trong năm 2025. Với xu hướng các thiết bị di động ngày càng mỏng nhẹ, số lượng cổng kết nối bị hạn chế, hub mở rộng trở thành một giải pháp tiện lợi giúp kết nối nhiều thiết bị cùng lúc.
Hub chuyển đổi Type C (Bộ chuyển đổi) 5 trong 1 | Bảo hành 18 tháng | 15596 15597 15495 20932 50209 70495 10919 20197
Dock sạc và hub mở rộng cổng kết nối là một trong những phụ kiện không thể thiếu cho người dùng laptop, tablet, PC trong năm 2025. Với xu hướng các thiết bị di động ngày càng mỏng nhẹ, số lượng cổng kết nối bị hạn chế, hub mở rộng trở thành một giải pháp tiện lợi giúp kết nối nhiều thiết bị cùng lúc.
Hub chuyển đổi Type C (Bộ chuyển đổi) 5 trong 1 | Bảo hành 18 tháng | 15596 15597 15495 20932 50209 70495 10919 20197 Ugreenvietnam.com.vn Phân Phối Bộ chuyển đổi Ugreen Hub chuyển đổi Type C (Bộ chuyển đổi) 5 trong 1 | Bảo hành 18 tháng | 15596 15597 15495 20932 50209 70495 10919 20197
Trên tay củ sạc Ugreen 300W - Ugreen 90903B
Ugreenvietnam.com.vn Phân Phối Bộ chuyển đổi Ugreen Hub chuyển đổi Type C (Bộ chuyển đổi) 5 trong 1 | Bảo hành 18 tháng | 15596 15597 15495 20932 50209 70495 10919 20197
Trên tay củ sạc Ugreen 300W - Ugreen 90903B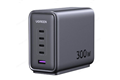 Cục sạc này của Ugreen 90903B có công suất lên đến 300W, 5 cổng (4C, 1A), anh em có thể dùng nó để sạc MacBook Pro 16-inch với công suất tối đa 140W
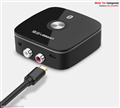 Đánh giá và nhận xét sản phẩm Bộ thu phát Bluetooth UGreen 40759, Kết nối quá đơn giản, chỉ cần 1 lần kết nối Bộ thu này với thiết bị phát (mình dùng điện thoại)
Cáp HDMI giá rẻ bị lỗi hình ảnh
Đánh giá và nhận xét sản phẩm Bộ thu phát Bluetooth UGreen 40759, Kết nối quá đơn giản, chỉ cần 1 lần kết nối Bộ thu này với thiết bị phát (mình dùng điện thoại)
Cáp HDMI giá rẻ bị lỗi hình ảnh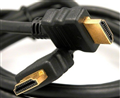 Cáp HDMI giá rẻ bị lỗi hình ảnh, Nhưng hiện nay cáp hdmi Ugreen đã giải quyết đc các lỗi trên. Với chất lương tốt đảm bảo tín hiệu ổn định. Cáp hdmi Ugreen sản xuất với công nghệ mới theo tiêu chuẩn EU.
Sửa lỗi kết nối cổng HDMI với HDMI không nhận
Cáp HDMI giá rẻ bị lỗi hình ảnh, Nhưng hiện nay cáp hdmi Ugreen đã giải quyết đc các lỗi trên. Với chất lương tốt đảm bảo tín hiệu ổn định. Cáp hdmi Ugreen sản xuất với công nghệ mới theo tiêu chuẩn EU.
Sửa lỗi kết nối cổng HDMI với HDMI không nhận Sửa lỗi kết nối cổng HDMI với HDMI không nhận, Người dùng có thể gặp vấn đề cổng HDMI không hoạt động khi kết nối màn hình mới.
 HDMI 2.1 ra mắt quý 2/2017: hỗ trợ độ phân giải tới 10K, HDR, cho phép chỉnh tần số quét
Sạc không dây trên iPhone 8 sẽ tạo nên cuộc đua mới
HDMI 2.1 ra mắt quý 2/2017: hỗ trợ độ phân giải tới 10K, HDR, cho phép chỉnh tần số quét
Sạc không dây trên iPhone 8 sẽ tạo nên cuộc đua mới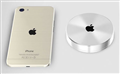 Sạc không dây kiểu mới được đánh giá là tính năng giúp iPhone 8 trở nên khác biệt và có thể khiến các hãng khác phải chạy theo giống như cảm biến vân tay, trợ lý ảo... trước đây.
Nhattin.vn giới thiệu Keyboard Bluetooth, Bàn phím cho máy tính bảng, tablet, smart phone mới nhất hiện nay
Sạc không dây kiểu mới được đánh giá là tính năng giúp iPhone 8 trở nên khác biệt và có thể khiến các hãng khác phải chạy theo giống như cảm biến vân tay, trợ lý ảo... trước đây.
Nhattin.vn giới thiệu Keyboard Bluetooth, Bàn phím cho máy tính bảng, tablet, smart phone mới nhất hiện nay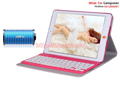 Bán bàn phím không dây, bàn phím bluetooth cho Samsung tab,note, ipad, tivi smart. Nhattin.vn chuyên cung cấp Bàn phím không dây bluetooth cho Samsung Tab 2, Tab 3, Note và ipad mini - iPad 2 - iPad 3 - iPad 4 bàn phím cho Smart Tivi giá rẻ nhất Hà Nội : LH 0912808081


 Mr.Trung - KD


